Wednesday, 11 December 2013

Space Marine Rhino / Razorback

Quite a long time ago (at least a year or so:P) I read that every Space Marine deserves a metal box (aka a Rhino) to be transported around the battlefield in style... Furthermore, the same sources also said buy the Razorback kit as its only a few quid more, and gives you the option to do both a Razorback OR a Rhino... And so I did! :)

Now as with all my projects this was quite some time ago and it has been under way for months... But now it's finally done and I can get this posted :D

The usual start consists of unpacking and immediately get building. Usually so fast that I forget to take any pictures, but this time I got at least one during assembly:

The Rhino hull is quickly finished, including the back ramp which opens...

All parts put together, leaving certain bits unglued to have both a Razorback (left) or a Rhino (right)...

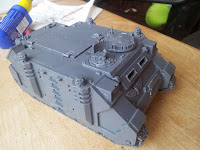
The Rhino and accessorizes ready for priming on the paint-sticks...

I then afterwards forgot to take pictures, but here is the primed black beast in its first match, at the end of turn 5 where it's tank-rushing a bunch of pesky Necrons :P

Now for the real painting... Metal parts (including the tracks) are painted with Leadbelcher and washed with Bedab Black. The entire hull is then painted with several layers of Macragge Blue to achieve proper covering... 

I decided to paint a white arrow on the top hatch, indicating that the Rhino belongs to a Tactical detachment:

After adding some details (headlights, the white Aquila, nameplate etc) the whole chassis was shaded using a blue wash (Drakendorf Nightshade)...

Finally, time for some highlights. As usual I went with line highlights instead of drybrushing... It takes a bit longer, but the effect is much better imo :) The first highlight is with some thick lines of Ultramarine Blue:

This is then followed by a secondary thin line highlight using a 50:50 mixture of Ultramarine Blue and Administratum Grey:

Finally, I added a bit of weathering by drybrushing some mud (Scorched Brown) on the tracks and bottom chassis, followed by a bit of Leadbelcher, applied with a sponge to resemble scratches and battle damage... and tada! The final and imo awesome result :D Was really fun painting a vehicle for a change and I cant wait to finish my Drop-pod and Land Raider asap... For now, enjoy! :D


Tuesday, 26 November 2013

WIP Land Raider

I have the best friends! :D

So I turned 30 a few weeks ago and a bunch of my lovely friends decided to pool their resources together and get me some awesome presents...
 

Based on the content of this blog it was decided that my army needed some Heavy Support (I might have mentioned it at some point) and hence they gave me the awesome Land Raider! 


Taking a few days to get over the hangovers from our party, I immediately set out to start building this beast of a tank! So eager was I, that I forgot to take any pictures before I started, so this is the first one, showing the inner compartment. The rubber bands are there to ensure that it glues together nicely without me holding it tight for hours :)
With outer armor-plates added...
And then the tracks...

Finally is was time to add the top, again glued and rubbered down to dry appropriately...

Now, the model I received for my present is the "standard" pattern Land Raider model aka Phobos. The Space Marine Codex does however offer another 2 additional variants known as Redeemer and Crusader. Games Workshop sell a separate spure with their weapons. Long story short, I decided to magnetizing the weapon mounts to enable exchange with the redeemer/crusader pack should I ever feel like that in the future...

To do this I glued two 3mm rare-earth magnets on the back of the mounts, and two corresponding magnets to a length of sprue

This length of spure just fit inside the door where the mounts is located.

Rinse and repeat for all 4 openings and both doors and mounts.

Finally, it was a simple matter of building the weapons (2 hard hitting twin-linked lascannons + a twin-linked heavy bolter) and mount those...

For comparison, here's a shot of the Land Raider with a Rhino I'm currently also building :)

Now all there is left is the simple matter of painting the beast :P Thanks again guys, I reckon there is still hours and hours of hobbying left in this project :D

Tuesday, 5 November 2013

WIP Space Marine Centurions


When pictures of these chunks of metal (okay plastic) started leaking I was torn whether they were awesome or silly... However, as I read the stats (and was in dire need of some heavy support) I was sold :) And so were they, as I ordered a pack (together with my limited edition Ultramarines Codex)

After waiting what seemed like forever, the miniatures finally arrived, and wow it's a tightly packed sprue! The kit has all weapon options for both Devastator and Assault Centurions, so obviously I opted to start magnetizing the entire bunch! :D

First I had to put the legs and torsos together which was straight forward. I'm really impressed with the quality of these new models, very few mold lines etc. so prepping takes minimal time...

Since comparison with a normal Space Marine

Weapons, weapons, weapons!

To ensure proper magnet alignment I add a blop of paint to one item (the arm) and fit it together with the gun, leaving another blop on the correct opposite position. 

It's then a simple matter of cutting/drilling out a hole with the correct size (1mm) and glue in the magnet. Rinse and repeat for the arm and about a gazillion other weapons! :P

A few weapon examples and poses...


The Centurions also comes with optional either chest-mounted Storm Bolter or Missille Launcher, so I decided to magnetize these as well...

Finally I added a few skulls and rocks to the bases followed by a layer of sand to create some texture. After allowing everything to dry the Centurions was spray painted with Chaos Black.


They are now camping my desk waiting for further treatment, but have already seen action helping me nuke some reason into a bunch of heretic Tau :)