Sunday 26 October 2014

Space Marine Devastator Centurions

Almost a year ago to the date, I posted my last update on these badboys (found here). In the meantime I have moved to Liverpool and we had our little boy wonder Odin, which has taken a huge chunk of my hobby-time. Not that I mind, just look at him! :D

Getting back to the Ceturions, as they were already primed black, it was a simply matter of base coating them Macragge Blue:

Secondly, I painted the bases with Scorched Brown and all metals parts Boltgun Metal.

Followed by a wash of Bedab Black (left one unwashed for comparison and NO, they are not holding hands!):

To make the gold elements stand out better these were first painted with Calthan Brown.

Gold paint added:

Finally, the gold was washed with Devlan Mud to tone it down slightly.

I then went into the nitty-gritty details and painted laurels, emblems, badges etc, to finalise the models.

To make the models look less flat, all crevasses and dimples were washed with Drakenhof Nightshade and raised edges highlighted with a 50:50 mix of Ultramarine Blue and Administratum Grey:

And viola! Only slightly less than a year after I bought the models, here is the final result after drybrushing the bases and adding some static grass:


And the entire gang lined up, ready Grav some xenos and traitor scum! I'll try and keep my updates more frequent... For now, enjoy! :)

Thursday 19 June 2014

Eldar colour-scheme

Hi peps! Time for a quick update :) As mentioned in many previous posts I've been spending the last few months building my wraith themed Eldar army. Having finally finished almost all of it, I decided to buckle down and decide on a colour scheme to encourage myself to eventually start painting them...

As a starting point, I had 5x Eldar Wraithguards with Wraithcannons undercoated white. 

Initially I was considering going with some "ethereal" colours to represent the ghost theme of the army. Basically, I painted each model with thin washes and drybrushed white for the ghostly effect....

However, even though it's a nice effect I felt that an entire army painted like this wouldn't really pop! on the tabletop. So I went searching online for inspiration... One of the posts that caught my attention was this one from Dakka Dakka.
I was certain I didn't want any shade of blue as my marines are already blue. I didn't want yellow either as I don't like the Iyanden colours one bit.. As red is the colour of my Warhammer Fantasy Khorne-based Warriors of Chaos army, so I decided to give green a go :)

I painted the whole model Caliban Green and did a test of the remaining highlights on the top part of his armour. Furthermore, I decided on blue'ish gems as I really like the way they stick out! Finally, I wanted to break up the green so I decided to keep his head, shoulders and kneepads pure white. I was sold on this look!!! So I decided to crack on and paint the rest of the model :D 
I wanted the gun to have a wraithbone tone to it, and after reading various guides I decided to try an easy approach by simply washing the already white gun with Agrax Earthshade (brown wash) and drybrush with Screaming Skull... I really like this simple effect! :) His loincloth was painted bright green (Moot Green) and heavily washed with Biel-Tan Green (green wash) to get some shading...

Following the same method as his top bit, I first highlighted all his armour with a thick line of Warboss Green. Secondly, I wanted the gems on his gun to be different from the rest, and inspired by the Dakka post previously mentioned, I went for orange (Blazing Orange).

Second hightlight was done with a thin line of Moot Green, while the orange gems were highlighted with Citrus Orange (from Miniature Paints). To tie the green highlights together a bit and help with shading in the recesses, I gave most of the armour a wash with Biel-Tan Green.

For the final results the gems on his armour was painted Sotek Green and highlighted with Lothern Blue. All gems then got a layer of Gloss Varnish to make them shine.
 The base was done as I usually do with a few layers of drybrushing, some rocks, skulls and a bit of static grass. To represent the awesome power of his wraithcannon I painted the inside with Sotek Green and drybrushed with Lothern Blue and Skull White to get the right glow..
A few images of the final model below. Must say it's one of my personal favourites so far and I cant wait to paint the remaining 1000 points worth of Wraiths! :D Enjoy and hope you like it as much as me...


Sunday 1 June 2014

WIP Magnetized Eldar Wraith Knight

Continuing the expansion of my newest army from my giant box of goodness, the Eldar Ghostwarriors, I have finally (last but not least) come around to the mighty Wraith Knight!

All the sprues laid out... Whew, quite a big project! Below is a few pics taken during assembly:

All individual limps etc put together...

Torso with it's plethora of spikes and blades...

And finally all weapons, guns etc more or less built...

Now this was the easy part... :) As usual, in order to not waste any parts of a very expensive model, the Knight off course needed to be magnetized... After some serious research I ordered a bunch of 6 mm magnets to supplement what I already have.

However, while the poor Knight was still lying in pieces on my desk I went to play a friendly last-game-of-6'th-edition with a Space Marine + Eldar list. As I really wanted to try playing my new Eldar I had to find a replacement (see image below)... The size fits fairly well and the model is certainly a beast on the tabletop! Thanks Bob for god sportsmanship and letting me play the wooden Knight ;)

Now on to the magnetizing, which ended up taking me the better part of a weekend, requiring a lot of measuring and dry-fitting before getting out the Super Glue...

The major bits, being the torso (magnetized mainly for easy of transportation), shoulders and all weapon arms were fitted with the 6 mm magnets. I also padded the shoulder joints with some Green Stuff to reinforce them.

The head was fitted with 5 mm magnets to enable movement, while shoulder weapons were mounted using smaller 3 mm magnets...

Finally here is the big boy in two different configurations :D Now all there is left is to base him and paint him... Check back in half a year maybe :P


On a sidenote, having enjoyed playing the Eldar so much, I immediately ordered their Codex and a Wave Serpent... Both of which arrived yesterday :)

Now the Codex is already read and the Serpent put together in the matter of a day :D I magnetized the weapons-mount using two 6 mm magnets, simply to make transport easier. Apart from that it was a straight forward build... At last now my Wraithguard will be riding in style :D
Thanks for reading and stay tuned soon for an update on my Space Marine Centurions and the process of selecting an appropriate colour-scheme for my Eldar :)

Monday 21 April 2014

Aegis Defense Line

Back in June 2013 the writing on the wall was that the flyers were coming (maybe it was already there and I just hadn't started reading walls yet)... :P

Anyhow, as my army contains no flyers and I had no immediate plans of adding any, I decided to follow the crowd and get myself an Aegis Defense Line (and more importantly, the Quad Cannon with Skyfire it gives access to). 
I have no pictures of unpacking and assembly as the wall is basically what you'd expect, a bunch of wall elements... I built the Quad Cannon, but have yet to finish painting it, so expect another separate post when I do :) Here is instead a picture of the wall in action for the first time, once again against some nasty Necron scum. The scouts in the picture are enjoying a particularly tasty +2 cover save thanks to mysterious objectives :D

At some point back in the autumn I managed to get around to spray painting the wall black but apart from that I've simply used it as-is... A few weeks ago however I finally managed to buckle up and get around to paint it. Luckily I picked up a random can of blue paint in a modelling shop and decided to give it a go. I went with blue simply so it could fit with my Ultramarines, even though it might not be the best colour for worn battlefield barricades...

Nice covering, but damn it's shiny! So I had to work around that... First step was to drybrush all edges and rims with Leadbelcher. Nothing fancy, just simple, quick and easy...

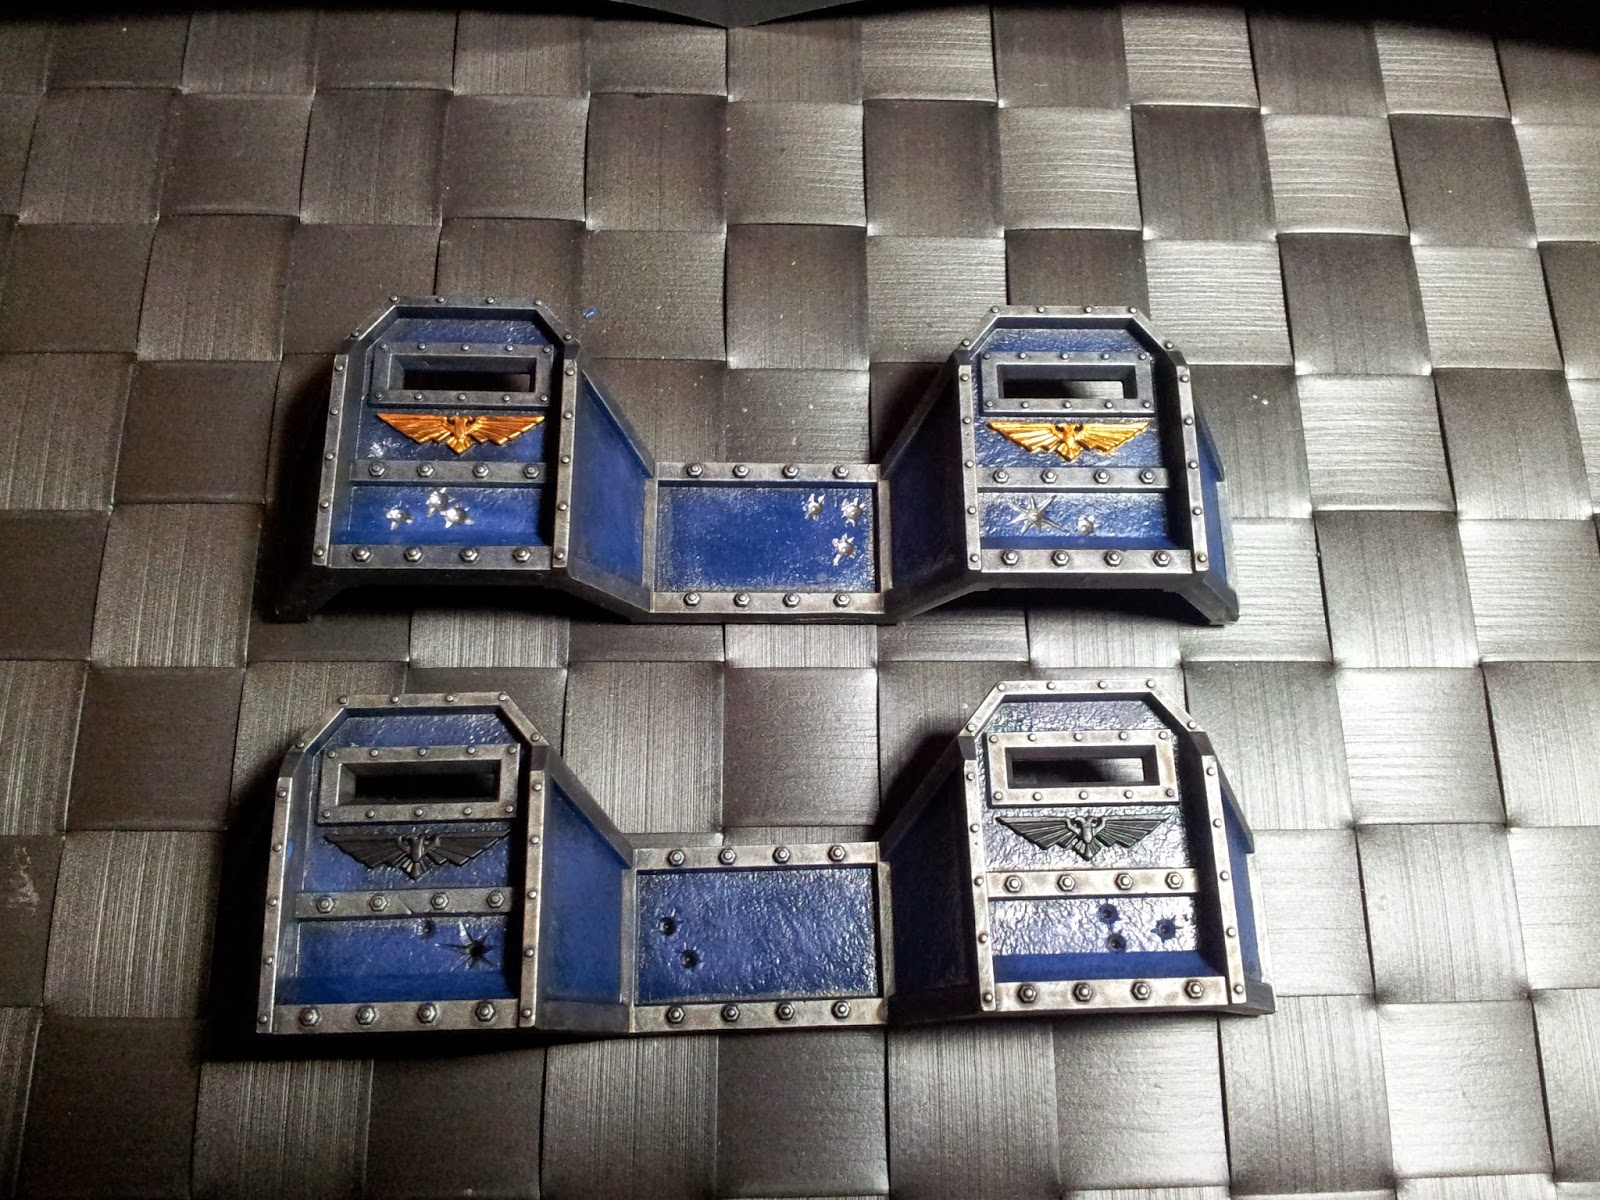
Followed by a good wash of Devlan Mud (bottom barricade)

To get rid of that dreadful blue shine I drybrushed the blue armour plates with Macragge Blue to tone it down a bit (top barricade for comparison)..

Finally, I painted the imperial crests black to have a proper base to work with, along with bullet-holes etc. The eagles were painted brown, followed by gold and then washed with Devlan Mud. The bullet-holes were simply painted with Leadbelcher and given a black wash...

And voila! Only a few hours of work and a result I'm actually quite happy with :D Hopefully some pics of the finished Quad Cannon will follow soon, but for now, enjoy the finished result...

Tuesday 18 March 2014

Current status after moving

As you might know I've recently uprooted from my home town in Denmark to move to the birthplace of the Beatles (that Liverpool for you savages that didn't know;) where I've gotten a job at the university :) Hence a few months have passed without any major updates to the blog as my painting time have been quite reduced...

However, moving to a much bigger city has enabled me to actually PLAY a lot more 40k :) Especially after joining the Liverpool Reapers where I so far have met a great bunch of friendly and helpful people :)

Between gaming, work, a pregnant girlfriend etc.  I am slowly again finding time to paint and build, and thought I should take the opportunity to make a short status post on my various projects, as I haven't actually finished many models lately.... So without further ado, here's what I'm currently working on :D

Space Marine Devastator Centurions
in November I posted a WIP thread on these badboys (found here) and I'm sorry to say not much has happened since, except that I've managed to paint them blue. Otherwise they have seen a fair amount of action and while playing I realized that the magnets I used for their weapons aren't strong enough, so they are currently being replaced by bigger and better ones :)


Drop Pod
I have for quite a long time been using a single drop pod in my army, but never gotten around to finish painting it. Currently it's just missing some washes and highlights, so should hopefully be done in a foreseeable future.


Tactical Marines
As mentioned in September I bought a bunch of marines that needed stripping and repainting. Some of them I already pimped and turned into Sternguard, while others were destined to become normal tactical marines to bulk out my forces. Below is 7 normal guys I managed to finish completely and there is also a handful on the way with special and heavy weapons as well as a few sergeants.


Space Marine Captain
While I've had the model for the Space Marine Captain around since the start (he's from the Assault on Black Reach box), I've never used him much in play until now. However, getting a land raider has really helped  me delivering close-combat units such as terminators and this guy is simply a great addition to a squad like that. Hence I've started painting him up :)


Land Raider Redeemer/Crusader
Finally, as mentioned in November I acquired a Land Raider for my 30th birthday. I magnetized all weapons mounts knowing that there was at least two other variants out there. Starting to play the game more I realized that maybe these other designs would be better suited, so I went ahead and bought the Redeemer/Crusader upgrade pack from GW. Auto-cannon and Multi-melta has now been assembled along with magnetized sponson weapons. The Land Raider itself is still unpainted and presents a daunting task that I however cant wait to get started on once I tied up a few more lose ends...

--------------------------------------------------------------------------------------------------------------------
Finally, as a Christmas present for myself I decided to jump on the bandwagon and get started on an Eldar army. I've always liked the Wraith constructs and when GW brought out the Wraithwing boxset I thought "perfect!" :D The set contains 1 Wraithknight (!), 2x Wraithlords and 3x 5man squads of either Wraihtguard or Wraithblades.

Now I promised myself I wouldn't start on this army until I finished at least the majority of my Ultramarines, but... fat chance! :D

Eldar Wraithlord
First model I decided to have a crack at was the wraithlord which turns out to be quite a tall stringy dude which certainly requires careful gluing to get posed correctly. So far he's without arms and weapons as I'm contemplating how to best magnetize everything...


Eldar Wraithguard + Blade
I also had a crack at a Wraithguard squad, and after long contemplation I decided to forego magnetizing weapons/arms and fit them with Wraithcannons. One, because I have 3 squads in total and hence can model the rest differently, and two, they look very similar to the D-scythes and can probably be played as such if need be most of the time. They were assembled, based and basecoated in Skull White primer. I have yet to settle on a colour-scheme but feel the Eldar should have more bright colours, hence the white :)

My final unit is another squad, this time Wraithblades. As my overall plan is to have one melee unit and two shooty I decided to magnetize them to enable use of either two swords or axe+shield. As seen below that's where I currently am on them :)

There! That's it for now with the progress of all my current units.... Stay tuned soon for some more regular posts once I start finishing off models :D