Quite a long time ago (at least a year or so:P) I read that every Space Marine deserves a metal box (aka a Rhino) to be transported around the battlefield in style... Furthermore, the same sources also said buy the Razorback kit as its only a few quid more, and gives you the option to do both a Razorback OR a Rhino... And so I did! :)
Now as with all my projects this was quite some time ago and it has been under way for months... But now it's finally done and I can get this posted :D
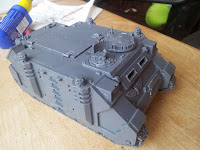
The usual start consists of unpacking and immediately get building. Usually so fast that I forget to take any pictures, but this time I got at least one during assembly:
The Rhino hull is quickly finished, including the back ramp which opens...
All parts put together, leaving certain bits unglued to have both a Razorback (left) or a Rhino (right)...
The Rhino and accessorizes ready for priming on the paint-sticks...
I then afterwards forgot to take pictures, but here is the primed black beast in its first match, at the end of turn 5 where it's tank-rushing a bunch of pesky Necrons :P
Now for the real painting... Metal parts (including the tracks) are painted with Leadbelcher and washed with Bedab Black. The entire hull is then painted with several layers of Macragge Blue to achieve proper covering...
I decided to paint a white arrow on the top hatch, indicating that the Rhino belongs to a Tactical detachment:
After adding some details (headlights, the white Aquila, nameplate etc) the whole chassis was shaded using a blue wash (Drakendorf Nightshade)...
Finally, time for some highlights. As usual I went with line highlights instead of drybrushing... It takes a bit longer, but the effect is much better imo :) The first highlight is with some thick lines of Ultramarine Blue:
This is then followed by a secondary thin line highlight using a 50:50 mixture of Ultramarine Blue and Administratum Grey:
Finally, I added a bit of weathering by drybrushing some mud (Scorched Brown) on the tracks and bottom chassis, followed by a bit of Leadbelcher, applied with a sponge to resemble scratches and battle damage... and tada! The final and imo awesome result :D Was really fun painting a vehicle for a change and I cant wait to finish my Drop-pod and Land Raider asap... For now, enjoy! :D


